Unity3D Skybox with Terragen2 Generated Images – Part 2

1. Start Unity and load project

2. Create Unity Skybox Material

(a) click on the menu Assets -> Create -> Material and name the new material SkyBox

Unity_Create_Skybox_Material

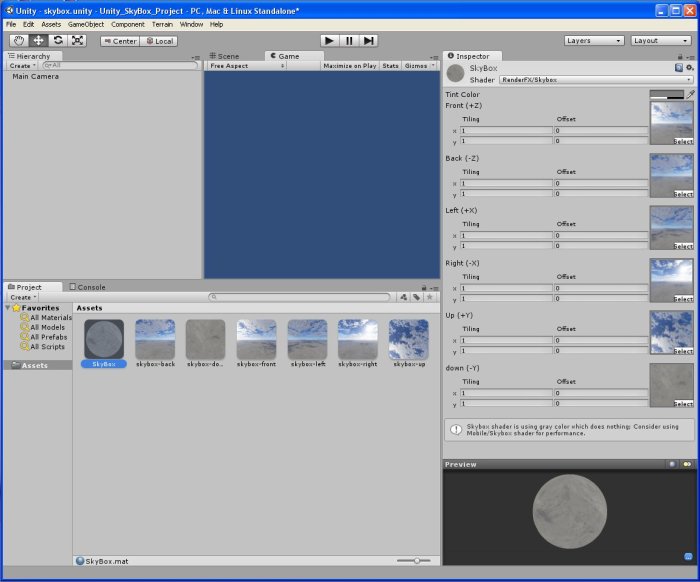
(b) Select the SkyBox material from assets and in the inspector click the Shader button and select RenderFX -> Skybox

(b) In Assets Select the SkyBox material and in the Inspector click the Shader button and select RenderFX -> Skybox

Unity_Create_Skybox_Material_02

3. Make sure all the Terragen2 SkyBox images Wrap Mode are set to Clamp

(a) In Assets locate and Select the SkyBox images

(b) In the inspector click the Wrap Mode button and  select clamp

Unity_wrap_mode_clamp

4. Add Terragen2 Skybox images to the Unity SkyBox material.

(a) Select the SkyBox material in Assets

(b) Click and drag SkyBox-Front image from Assets to the Front slot of the SkyBox material in the inspector.

(b) Click and drag SkyBox images from Assets to corresponding slots of the SkyBox material in the inspector.

Unity_drag_and_drop_corresponding_images

5. Apply Skybox Material in Render Settings

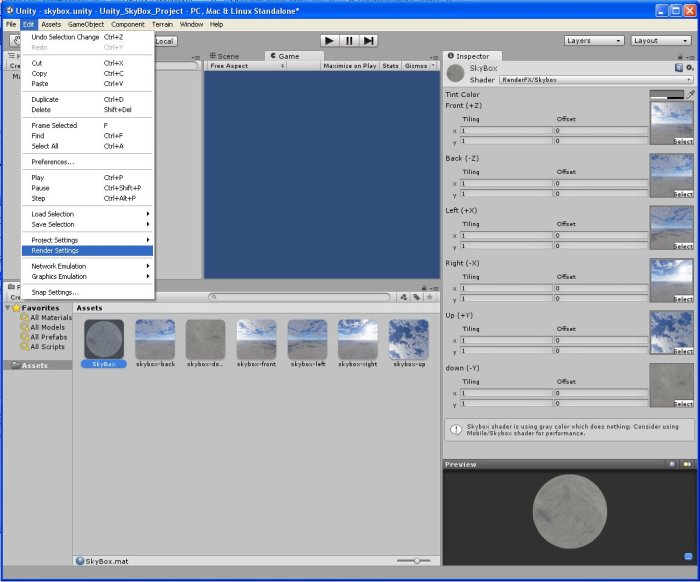
(a) From the menu click Edit -> Render Settings to open the render setting in the inspector

Unity_render_settings

(b) Drag your Skybox material from Assets to Skybox Material Slot in the inspector for Render Settings

Unity_drag_and_drop_SkyBox_render_settings

Unity3D Skybox with Terragen2 Generated Images – Part 1

The overall objective is create a skybox within Unity using images generated with Terragen2.

The objective of this tutorial is to use Terragen2, and input the minimum settings required to export images for a seamless skybox with clouds, within Unity.

1. Launch Terragen2 and begin a new project.

2. Set up the render camera

(a) Click the Cameras button near the top.

(b) Select the /Render Camera in the top left quadrant.

(c) Change all rotation values to 0.

(d) Make sure Perspective is checked and Use horizonal fov is set to 90

Camera_button

3. Add clouds to your atmosphere.

(a) Click the Atmosphere button near the top.

(b) Click the AddCloud Layer button above the right quadrant.

(c) Choose /Altocumuls from the drop-down list.

Add_clouds

4. Render your images

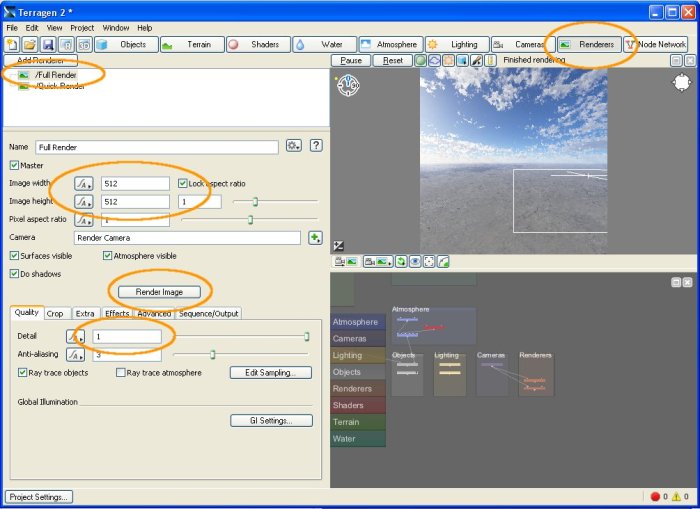
(a) Click Renderers button near the top.

(b) Select /Full Render in the top left quadrant.

(c) Change Image width and Image height to 512 and lock aspect ratio.

(d) Make sure Detail is set to 1 to prevent any seams appearing in your Skybox.

(e) Click Render Image button to open Render View window and render the image.

set_up_renderer

5. (a) After render is complete click the save button and save image as skybox-front.bmp to your ..\Unity_Project\Assets\  folder.

render_view_save

6. Render the remaining images required for skybox.

(a) Change camera rotation values as you did in step 1c.

(b) Render and save each of the following images to your  ..\Unity_Project\Assets\ folder as you did in step 5a.

skybox-front.bmp

skybox_front

skybox-back.bmp

skybox_back

skybox-left.bmp

skybox_left

skybox-right.bmp

skybox_right

skybox-up.bmp

skybox_up

skybox-down.bmp

skybox_down

Reference Resources:

http://rabiuls.wordpress.com/2010/09/21/making-skybox-with-terragen-for-unity-3d/

http://planetside.co.uk/wiki/index.php?title=Quick_Start

http://docs.unity3d.com/Documentation/Manual/HOWTO-UseSkybox.html

http://www.planetside.co.uk/